
Blog
Lash Lift Kit – DIY Eyelash Curling & Perming Kit for Salon Results at Home
If you have ever looked in the mirror and wished your lashes stayed lifted without mascara or a curler, you are not alone. I felt the same way after years of using lash curlers that worked for ten minutes and mascaras that smudged by noon. That is when I tried my first lash lift kit at home.
This is written to help real people who are curious about using a DIY eyelash curling and perming kit for salon results at home. No hype. No sales talk. Just clear guidance, honest tips, and lessons learned from experience.
What Is a Lash Lift Kit and How Does It Work
A lash lift kit is a DIY system that curls and lifts your natural eyelashes from the base. Unlike false lashes or extensions, it works with what you already have.
Here is the simple idea behind it:
- Your lashes are wrapped gently around a silicone rod
- A perm solution softens the lash structure
- A setting solution locks the curl in place
- The result is lifted lashes that last weeks, not hours
Think of it like a perm for your lashes, but much gentler when done correctly.
How Long Does a Lash Lift Last
Most lash lifts last 6 to 8 weeks, depending on your lash growth cycle and how well you care for them. My first lift lasted just over six weeks before I noticed new lashes growing in straight again.
Why People Choose a DIY Lash Lift Kit at Home
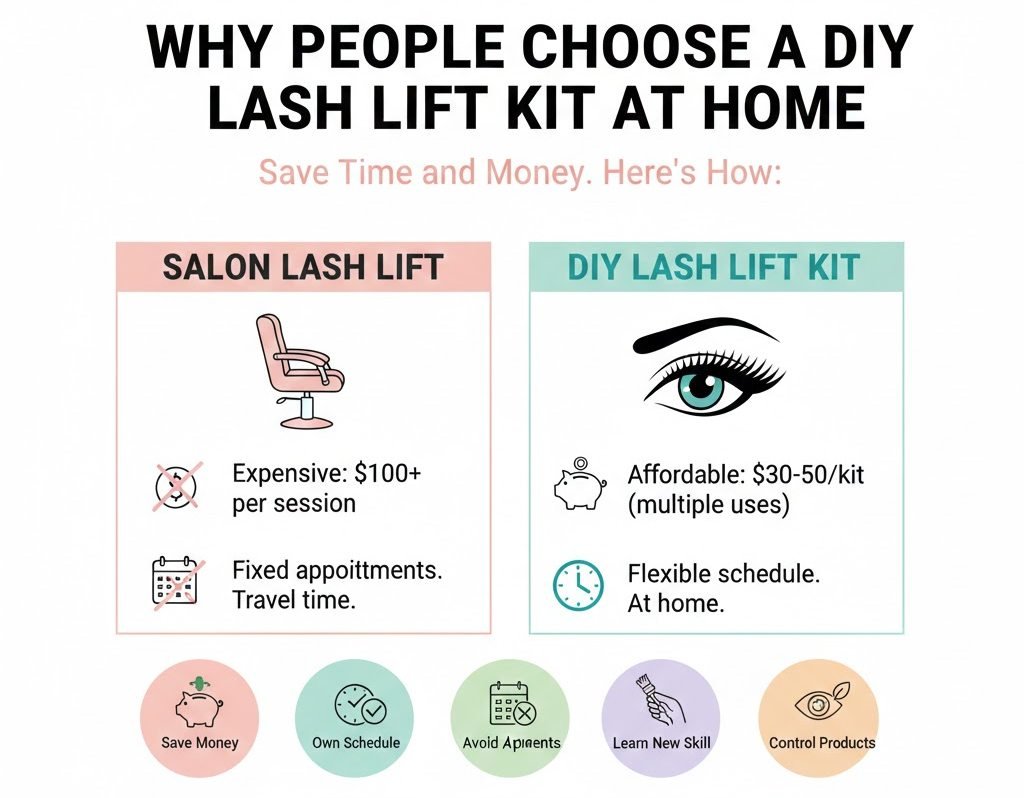
Salon lash lifts can be great, but they are not cheap. In many places, one session costs more than a complete DIY lash lift kit that can be used several times.
Here are the most common reasons people go DIY:
- Save money long term
- Do it on your own schedule
- Avoid salon appointments
- Learn a new beauty skill
- Control the products used on your eyes
A lash technician I spoke with once told me, “Most mistakes happen from rushing, not from lack of skill.” That advice applies perfectly to at-home lash lifts.
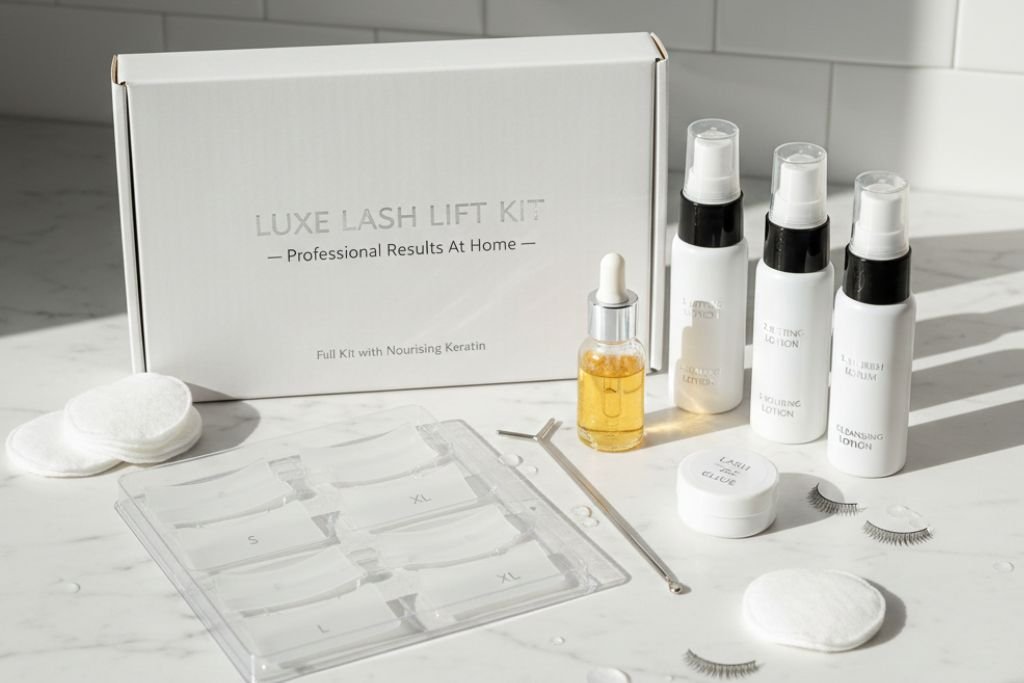
What Comes in a Typical Lash Lift Kit
Most kits include similar items, though quality can vary.
Everyday Items Inside a Lash Lift Kit
- Silicone curling rods in different sizes
- Lash adhesive
- Lifting or perm solution
- Setting or fixing the solution
- Nourishing oil or serum
- Lash comb or Y brush
- Under eye pads
Before using any kit, check expiration dates and read the instructions thoroughly. Skipping this step is the number one reason people get uneven results.
Choosing the Right Lash Lift Kit for Your Needs
Not all lash lift kits are equal. Choosing the right one depends on your lashes and experience level.
Things to Look For
- Clear instructions with timing guidance
- Gentle formulas labeled for eye use
- Multiple rod sizes
- Enough product for several uses
- Good reviews from real users
Lash Type Matters
| Lash Type | Best Rod Size | Tip |
|---|---|---|
| Short lashes | Small or medium | Do not over curl |
| Medium lashes | Medium | Most flexible |
| Long lashes | Large | Avoid tight curl |
If you are unsure, always start with a larger rod. You can go tighter next time.
Step-by-Step Guide to Using a Lash Lift Kit at Home
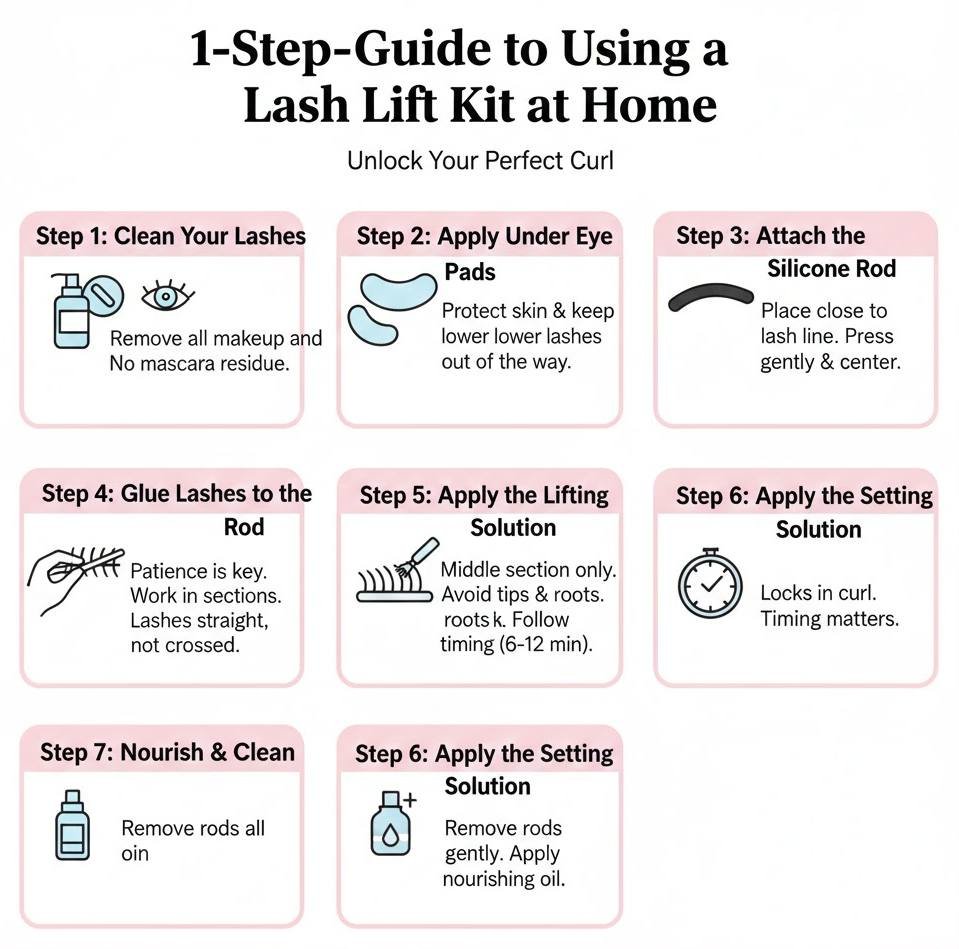
This is based on my own experience plus advice from licensed estheticians.
Step 1: Clean Your Lashes
Remove all makeup and oils. Even a little mascara residue can stop the glue from holding.
Step 2: Apply Under Eye Pads
These protect your skin and keep lower lashes out of the way.
Step 3: Attach the Silicone Rod
- Place the rod close to the lash line
- Press gently so it sticks evenly
- Make sure it is centered
Step 4: Glue Lashes to the Rod
This step takes patience.
- Work in small sections
- Use the lash comb to separate
- Make sure lashes are straight, not crossed
Step 5: Apply the Lifting Solution
- Only apply to the middle section of lashes
- Do not touch the tips or roots
- Follow the timing exactly
Most kits range from 6 to 12 minutes, depending on lash thickness.
Step 6: Apply the Setting Solution
This locks in the curl. Timing matters as much here.
Step 7: Nourish and Clean
Remove rods gently and apply nourishing oil.
Common Mistakes and How to Avoid Them
Even good kits can give bad results if misused.
| Common Mistake | What Happens | How to Avoid It |
|---|---|---|
| Over-processing | Leaving the solutions on too long can make lashes dry or brittle. More time does not create a better curl. | Follow the exact timing in the instructions and adjust based on lash thickness. |
| Rod too small | Lashes curl backward instead of lifting upward, creating an unnatural look. | Start with a medium or large rod, especially if you are new to lash lifts. |
| Crooked placement | If the rod is not straight, lashes will lift unevenly. | Take extra time to align the rod evenly along the lash line before applying glue. |
| Rushing the process | Rushing leads to uneven curl, crossed lashes, or poor results. | Set aside at least 45 minutes and avoid distractions during the process. |
Safety Tips From Professionals
I once asked a lash educator what she wished more DIY users knew. Her answer was simple.
“Patch test every time, even if you used the kit before.”
Important Safety Rules
- Always do a patch test
- Never use on irritated eyes
- Do not mix brands of solutions
- Avoid contact with water for 24 hours
- Do not repeat within 6 weeks
If something stings or burns, remove it immediately.
Lash Lift Kit vs Lash Extensions
Many people ask which is better. The answer depends on your lifestyle.
| Feature | Lash Lift | Lash Extensions |
|---|---|---|
| Uses natural lashes | Yes | No |
| Maintenance | Low | High |
| Cost over time | Lower | Higher |
| Look | Natural | Dramatic |
| Damage risk | Low if done right | Higher |
If you want low-effort beauty, a lash lift kit is often the better choice.
Aftercare Tips for Long Lasting Results
What you do after matters just as much as the lift itself.
First 24 Hours
- No water
- No steam
- No mascara
- No eye rubbing
Ongoing Care
- Use lash serum or oil
- Avoid waterproof mascara
- Be gentle when cleansing
These small habits can add one or two extra weeks to your results.
Frequently Asked Questions
| Question | Answer |
|---|---|
| Can beginners use a lash lift kit? | Yes. Beginners can use a lash lift kit as long as they read the instructions carefully, work slowly, and follow the timing guidelines. |
| Does a lash lift damage lashes? | When done correctly and not too often, damage is minimal. Overprocessing or lifting too frequently can cause dryness or breakage. |
| How often can I do a lash lift? | Every 6 to 8 weeks is the safest timeframe, as this matches the natural lash growth cycle. |
| Can I wear mascara after a lash lift? | Yes. You can wear mascara after 24 hours. Many people find they need less mascara because lashes already look lifted. |
Final Thoughts
A lash lift kit, DIY eyelash curling, and perming kit for salon results at home can be a great option if you want lifted lashes without the salon cost or commitment.
It is not about perfection. It is about learning what works for your lashes, taking your time, and treating your eyes with care.
If you are patient, careful, and realistic, a lash lift at home can become one of the easiest beauty routines you keep coming back to.